Use the Advanced Editor
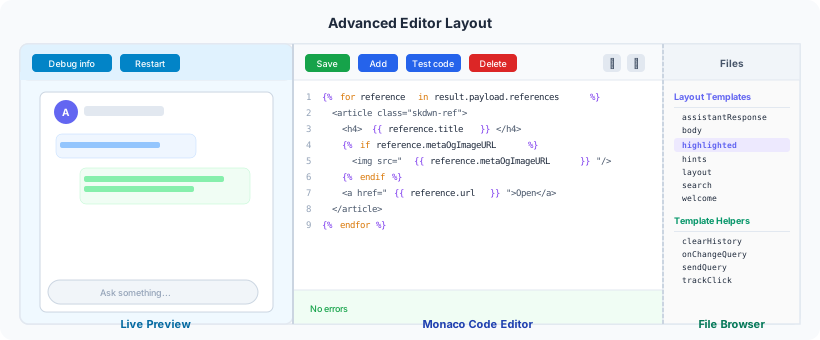
The Advanced editor is where you shape what the assistant looks like and how it behaves — live, with instant feedback. It splits the screen into three areas: the live assistant preview on the left, the code editor in the center, and the file browser on the right.
The Three Panels
| Panel | What it does |
|---|---|
| Live preview (left, ~35%) | A real instance of your assistant running inside the editor. Every time you save, it restarts automatically so you see changes immediately. |
| Code editor (center) | A Monaco-based editor with syntax highlighting for Liquid (templates) and JavaScript (helpers). Includes autocompletion for Liquid tags ({% if %}, {% for %}, {% include %}, etc.) and real-time validation of balanced delimiters and block nesting. |
| File browser (right panel, toggled) | Lists every template and helper alphabetically, grouped into Layout Templates and Template Helpers. Click one to load it into the editor. |
The Editor Toolbar
The toolbar at the top of the code editor gives you quick access to every action:
| Action | What it does |
|---|---|
| Save | Saves the current changes to the assistant configuration and restarts the live preview. Only enabled when there are unsaved changes. |
| Add → Add Template | Creates a new named Liquid template (alphanumeric ID). |
| Add → Add Template Helper | Creates a new JavaScript helper function. |
| Test code | (Helpers only) Opens a JSON input where you type parameters, then runs the helper and shows the return value in the debug panel. |
| Delete / Return to default | Removes your override for the selected template or helper, reverting it to the built-in default. |
| Toggle assistant (bug icon) | Shows or hides the live preview panel — useful to give the editor more space. |
| Toggle files (folder icon) | Shows or hides the file browser. |
The Assistant Toolbar
Above the live preview, a second toolbar controls the assistant instance:
| Action | What it does |
|---|---|
| Show debug info | Switches the preview panel to debug mode — a JSON viewer that shows runtime errors, helper return values, and template state. |
| Show assistant | Switches back from debug to the live assistant. |
| Restart assistant | Manually restarts the embedded assistant without saving. |
| Clear debug | Clears the debug output. |
The Workflow
- Open the assistant's configuration and navigate to the Advanced editor tab.
- Open the file browser (folder icon) and pick a template or helper to edit.
- Edit the code. The editor validates Liquid in real-time — you'll see red markers for unclosed blocks, unbalanced delimiters, or mismatched tags.
- Click Save — the assistant restarts in the preview panel with your changes.
- If something breaks, switch to debug mode to see the error, fix the code, and save again.
- For helpers, use Test code to run the function with sample parameters and inspect the return value in the debug panel.
Tips
- Start from the default template — open it in the file browser, copy the Liquid to a new override, and change only what you need. You keep all the wiring (helpers, classes, data attributes) the assistant depends on.
- Turn on
isDebug: truewhen embedding during development — it logs the full template state to the console. - The editor only works on desktop screens. On mobile or narrow viewports it shows a warning instead.