Embed an Assistant on a Website
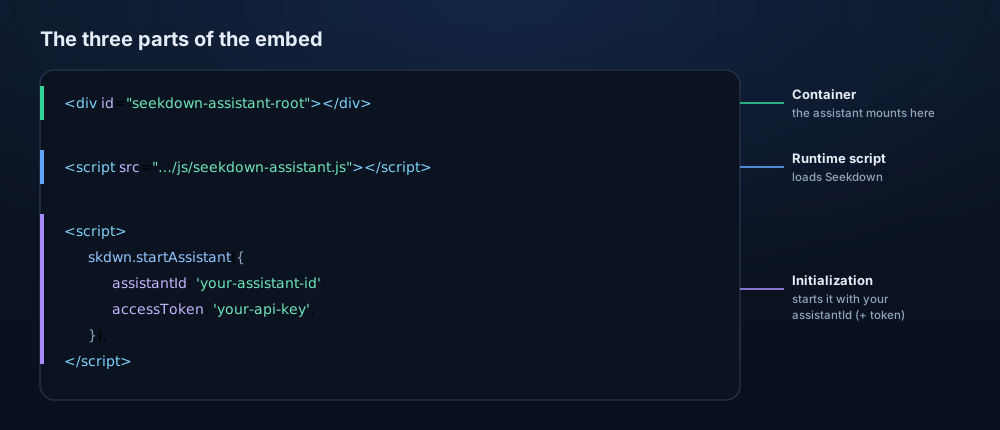
Going live is mostly copy-paste. You add three things to your page — the Seekdown runtime script, a container element, and a short snippet to start it — and that's it. This is the exact snippet the product generates for you.
Before You Start
- Add the site's domain to allowed origins.
- Generate an API key if the security mode is API.
- Know the assistant ID.
Snippet
<div id="seekdown-assistant-root"></div>

<!-- Include the public Seekdown runtime -->
<script src="https://saas.seekdown.ai/js/seekdown-assistant.js"></script>

<!-- Initialize the assistant with your assistantId and accessToken -->
<script>
  document.addEventListener('DOMContentLoaded', function () {
    if (window.skdwn?.startAssistant) {
      let seekdownAssistantOptions = {
        assistantId: 'your-assistant-id',
        accessToken: 'your-api-key-or-identity-access-token',
      };

      skdwn.startAssistant(seekdownAssistantOptions);
    } else {
      console.error('skdwn.startAssistant is not available.');
    }
  });
</script>
The access token is optional
Include accessToken only when the security mode is API (an assistant key) or OIDC (your provider's JWT). A None-mode assistant can start with just assistantId.
Where to Place the Snippet
- Put the runtime
<script>and the container<div>just before the closing</body>tag, so the page is loaded before the assistant starts. - The container
<div id="seekdown-assistant-root"></div>must exist on the page — the assistant mounts into it. - If your site enforces a strict Content-Security-Policy, allow the script and connection to
saas.seekdown.ai, or the runtime won't load.
Initialization Options
startAssistant(options) takes an options object. Only a couple are required — the rest let you tailor who the assistant is for and how it looks:
| Option | Required | What it's for |
|---|---|---|
assistantId | Yes | Which assistant to load. |
container | No | Where to mount the widget — a CSS selector or a DOM element. Lets several assistants live on one page, each in its own container. Defaults to the element with id seekdown-assistant-root. See Multiple Assistants on One Page. |
accessToken | For API / OIDC | The assistant key (API mode) or your provider's JWT (OIDC). Leave it out for a None-mode assistant. |
serviceURL | Auto | The Seekdown service URL. Defaults to https://saas.seekdown.ai, so you normally omit it. |
userId | No | A stable identity for the visitor. If you don't set one, Seekdown generates a UUID and stores it in the browser — so a returning visitor keeps their conversation and counts as one unique user. Set it to tie the visitor to your own account ID. |
userInformation | No | A flat set of key–value strings about the visitor (e.g. email, plan, locale). They ride along with analytics as user.* properties, so you can segment usage. |
additionalContext | No | A string of extra context added to the assistant's prompt and made available to its templates at runtime — for example a short line describing the signed-in user or the current page. |
config | No | Local overrides deep-merged into the assistant's remote configuration — theme, layout, the floating button, even template overrides. Lets you embed the same assistant with a different look on different sites. |
baseURL | No | Base URL for static assistant assets; rarely needed. |
isDebug | No | When true, logs template state to the console — useful while developing template overrides. |
Personalize per visitor
userId, userInformation, and additionalContext are how you make the assistant feel account-aware — for example, pass the signed-in user's plan so the templates can greet them or tailor answers, without exposing anything secret in the page.
Lifecycle Events
startAssistant(options, events?) takes an optional second argument so you can hook into its lifecycle:
onStarted()— fires once the assistant has mounted and (if enabled) restored the previous conversation. Use it to hide a loader or track "assistant ready".onError(error, info)— fires if initialization fails;info.componentStackgives context. Use it to show a fallback or retry.
<script>
  skdwn.startAssistant(
    {
      assistantId: 'your-assistant-id',
      accessToken: 'your-api-key',
      userId: 'customer-42',
      userInformation: { plan: 'pro', locale: 'en-US' },
      additionalContext: 'Signed-in user is on the Pro plan at Acme.',
      config: { settings: { baseTheme: 'dark' } },
    },
    {
      onStarted: function () { console.log('Assistant ready'); },
      onError: function (err, info) { console.error(err, info.componentStack); },
    }
  );
</script>
Multiple Assistants on One Page
You can run several assistants on the same page at once — for example a search box in the header and a support chat as a floating button. The rule is simple: load the runtime once, give each assistant its own container, and call startAssistant once per assistant with a container. Starting one never tears down the others.
<!-- Load the runtime once -->
<script src="https://saas.seekdown.ai/js/seekdown-assistant.js"></script>

<!-- One container (with a unique id) per assistant -->
<div id="assistant-search"></div>
<div id="assistant-support"></div>

<script>
  const base = { accessToken: 'your-api-key', serviceURL: 'https://saas.seekdown.ai' };

  // Header search assistant
  skdwn.startAssistant({
    ...base,
    assistantId: 'as-search',
    container: '#assistant-search',
    config: { settings: { baseTemplate: 'overlay' } },
  });

  // Floating support chat
  skdwn.startAssistant({
    ...base,
    assistantId: 'as-support',
    container: '#assistant-support',
    config: { settings: { floatingActionButton: { useFloatingActionButton: true } } },
  });
</script>
Each instance is fully isolated — its own connection, configuration, templates and state — so they can share an assistantId or use different ones without interfering.
Addressing a specific assistant. The runtime exposes a small API on window.skdwn:
| Property / method | Returns |
|---|---|
skdwn.instances | An array of every live assistant on the page. |
skdwn.instance | The contextual assistant — the one whose UI fired the current event or is rendering. This is what template handlers (onclick="skdwn.instance.helpers.…") resolve to, so each widget always drives itself. |
skdwn.instanceFor(target) | The assistant mounted into a given container (a selector or element), or undefined. Use it to control a specific widget from your own page code. |
// Open the support chat from your own button
const support = window.skdwn.instanceFor('#assistant-support');
window.skdwn.instance = support;                 // point the context at it
support.helpers.toggleShowFloatingWindow(true);  // helpers act on the current context
A few practical notes
- The runtime <script> is loaded once — it exposes the single window.skdwn object. - Container ids must be unique; omit container to use the default #seekdown-assistant-root. - Starts are queued (a container can't be mounted twice at once), but starting a second assistant does not stop the first. - Restarting an assistant means calling startAssistant again with the same container — only that one restarts.
Verify the Result
Open the page and confirm the assistant appears and answers.
Troubleshooting
- If the widget is missing, check the script URL, the container, and the browser console.
- If access is blocked, check allowed origins and the token.